Crunch time

Last week before final and there is so much left to do that I actually don’t know where to start. We have had to cut so much content to gain more time but it seems like there won’t be any game at all in the end.

So as stated above, this week have been all about crunching. I have managed to get a lot of things done, however most of them have been small polish things that took no longer than just below an hour. Therefore there is not much for me to write about in this post, since i can’t explain my thoughtprocess throughout out the fixes since they are quite self explanatory.

The most important thing I managed to get working was the soundmanager. Previously several soundclips couldn’t play at the same time since they were not in a list. If the sounds managed to “play at the same time” the last sound played would instantly cut out the previous sound. This really needed to get fixed since the game sounded horrible when you were shooting and hitting enemies or walls. So that’s why our group rated it as a high priority target. At times the sounds did not even play due to another sound starting to play milliseconds after the first sound was created.

As stated above I fixed this by simply creating a list inside of the soundmanager class that took care of every sound played. We also used an unusual amounts of pointers to make the pther classes be able to use the sounds as well as the soundmanager. Creating a trigger for each sound and each music file with if statements most of the time. This eventually removed the issue we had from the beginning. After that all that needed to be done for the sound to be fully fixed was to implement the missing soundfiles, and create triggers for them so that they were used inside of the game somehow and somewhere.

I will have to excuse for this post being such low quality compared to the previous ones. It is currently 5 am on friday(the day when the project it supposed to be sent in) and I am extremely tired. But the game needs to be completed and that is what is going to happen.

This will most likely also be the last update for this blog since the course ends next week.

Either way, back to crunching!

97102695740e036c79fe3f1be6d6224f

Menu polish

First week of beta and that means polish, polish and polish. There’s a lot to do with so little time left until the game is supposed to be in it’s final version. However since every mechanic and big feature is already implemented into the game there will be a slight change of pace and a change in how we work. Polishing and refining what we already have requires a different mindset than before. Because now we’re deciding whether something is ready for release or not, while before it was whether the mechanic or feature was actually working.

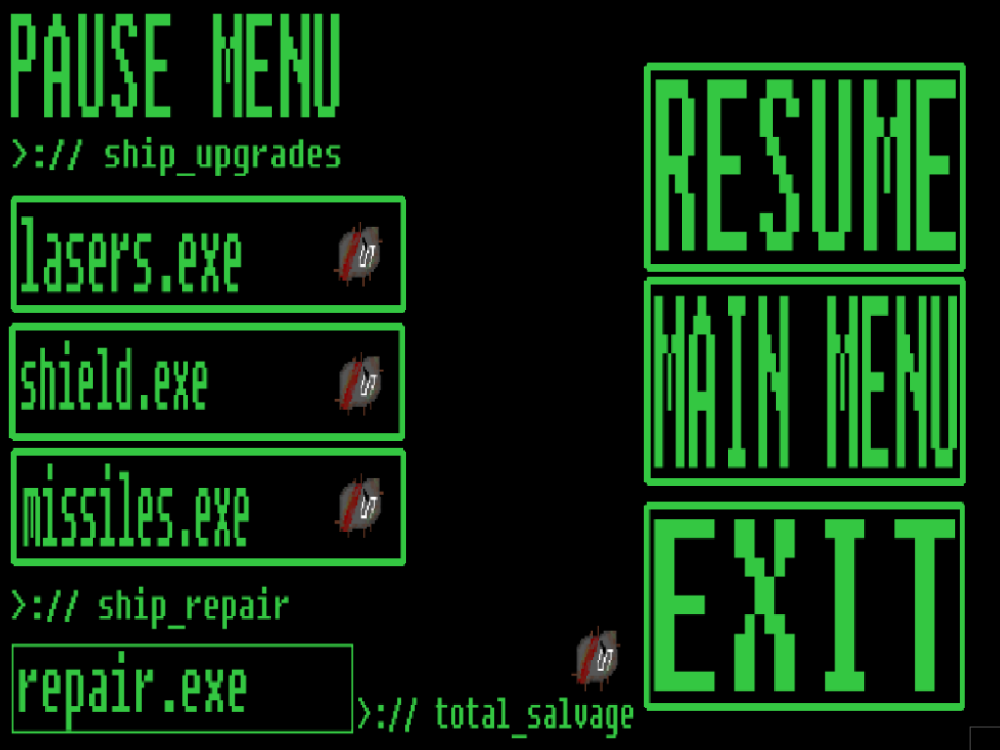
First up to do is to refine how our games’ upgrade meny works. When the beta started all we had was the upgrade menu itself that also paused the game, but there were no indicators on how to use it for the players. All of the materials the player could or had scavenged for couldn’t be seen anywhere and if the player managed to figure out that they had to use the buttons of 1, 2 and 3 all of the materials were consumed on the first button press. Which is not ideal since it removes the need to scavenge for several things, and forces the player to only pick up one material at a time.

These were all things that obviously needed fixing before the game enters it’s final stage and to fix these are my weeks assignment.

First thing that I felt like I could fix was the issue when all of the materials were consumed at the same time. Well, not really at the same time but the longer you held down one of the three buttons (1, 2 or 3) the more materials were being consumed. To fix this I had to create some kind of break method or pause function for when you clicked one of the buttons. In more detailed words, if the player pressed one of the buttons, the function would stop working after it’s been activated once. After that, even if the player are still holding down the button, nothing will happen.

Luckily we had already done a similar thing to our cannon and when it shoots. When we didn’t have the break method the cannon would shot one projectile for every frame, resulting in massive framedrop. Since theoretically the player were shooting  60 projectiles per second.

We solved that issue by creating two different variables. One called “pressed” and the other one called “lastPressed”. The variable pressed is then made so that it’s equal to the button click of the button 1. However, lastPressed is put to false, which means it’s inactive, or not used.

When the variables are done we then created an if statement that tells the game that if pressed(which means that if button 1 is pressed) and lastPressed is false then the action will happen. After the if statement we then tell lastPressed that it is equal to pressed, which then puts it to true.

If we then do the exact same thing for buttons 2 and 3, every time you press another button, the button that was pressed beforehand will be put to false again. So that you can use it only after you’ve pressed another button. Creating an illusion of a break method or timer or pause function, whatever you want to call it.

We then implement this into the pause menu’s button clicks and lo and behold we have fixed the issue that needed to be fixed!

236ba2eaac6c55333720849c0fb0a071

Individual Assignment

Hi group 7!

First things first, If I’m not mistaken since I can’t see it but it can be me being blind. You are not using any kind of managers to handle events in the Player.cpp class. I strongly recommend using managers since you never need to re-write code everywhere and can instead re-use code from the manager just by pointing to it. Which is a lot quicker and more efficient to do than to completely re-write everything all the time. This removes unnecessary code and creates a more structured feel to the whole project. It also decreases the chance for errors!

I also recommend using SFML implemented functions as Move as an example. Move makes it a lot easier to manage the movement of objects or sprites, since you don’t have to write your own movement. Since it’s an implemented function in SFML you can use it automatically in all classes. Which yet again makes coding more efficient and structured, which in itself isn’t completely necessary, but I still strongly recommend it.

Using bounding boxes is something that is really good. It’s easy to manage since due to the simplicity of the function since it’s short and memorable and also already implemented in SFML. You can also quickly make the box smaller or bigger as well as changing where it’s located by using other already implemented SFML functions. In th end it’s a really effective use of a hitbox due to several reasons I’ve stated above.

The overall structure of the code seems like it’s quite well done apart from what is stated above. You use a ton of different written functions for all of your unique entities that are defined in the Player.cpp which is really good.

You’re also not implementing everything into main.cpp directly which is nice. Coding directly in main.cpp is incredibly lazy and I advise you to keep on not doing it. Good code structure is actually important when the projects starts to get big, since it’s easier to navigate and find where everything is located. Which is almost impossible if everything is located in the main.cpp, since there would be so many lines of code that it would be practically impossible without directly using the search function and searcing for exactly what you’re looking for.

Take all of this with a grain of salt, I’m in no way an experienced programmer, but this is my first impressions of your player class.

Powerups, powerups & powerups!

So this week is the last sprint before the beta, and therefore there’s a huge amount of work that needs to be done. I chose to finish all of the remaining powerups that our team have yet to scrap. These are the shield upgrade, rocket launcher and laser cannon. All of them was supposed to have different mechanics and behaviors which is the more difficult part to actually succeed in.

First upgrade i decided to try and create was the one i deemed the most difficult of the lot, the shield. Essentially what I had to do was to rework or previous healing function so that instead of healing, it blocked damage until it was depleted and after that the damage started to drain the players hp instead.

I started with creating a sprite with a bounding box and put that sprite in a certain spot. I then made it so that if the player drove over the sprite a value would change from 0 to 1 showing that the shield would be active. I then went and added an if statement where the player takes damage that roughly asked if the shield is active, attack the shield until it’s depleted. If the shield is depleted, attack the players regular hp.

Note that depleted =//= inactive since the shield is only inactive before you’ve picked up the upgrade. After that you have the shield permanently. Depleted is a state that means that it’s still active, but does nothing until it’s charged up.

Next up on the chopping block is the implementation of different kinds of weapons. In our current state of the game we only have a main cannon that shot bright yellow projectiles. So I had to manage to implement a rocket launcher that shoots bigger slow moving projectiles that explode when they hit a bounding box and damage in a small area. I also had to implement the laser cannon which shoots bright red projectiles that pierce boundingboxes resulting in the player being able to hit several enemies with once shot.

All I did was to re-use our previous projectile code and rename all the variables and change some numbers, implement them into the other classes with pointers and then add new sprites and animations. However I havn’t managed to get the rocket launcher to explode in a small area. I do however know how am supposed to tackle this particular element. I just have to spawn in a bounding box on the position where the projectile hit and that any other bounding boxes that are inside or touching the spawned in one takes damaged.

81494c8a1eb0b22149a26a0cd5e89a88

Week 5 – Enemy hitboxes and death

New week, new assignments and my focus this time was on successfully managing to get the enemy hitbox to work with the players bullets as well as getting the enemy to “die” after getting hit by the projectiles.

This was supposed to be done last week, be due to the amount of work we had left to do we had to cut some things out. However we had to prioritize those cut assets this week since they were a must for the alpha to be shipped.

Firstly I had to decide what kind of hitboxing we wanted for our game and I had two versions in mind. Firstly the standard intersecting bounding boxes which works by checking if area x intersects with area y. Which is an if statement as well, so if they are intersecting you can make pretty much anything happen. Easier to make, easier to use. But isn’t exactly as

The other “hitbox” i was thinking about creating was a circular one which works almost in the same way as a bounding box. However, it uses a cosinus and sinus equation which constantly checks the direction to the object you want it to be able to collide with. Since it checks the distance constantly it’s more fitting to use it where there aren’t that many objects. But since I was trying to get all shot projectiles to be able to collide with the enemy. It would drain too much on the memory to justify the somewhat better hitbox.

So I decided to use the intersecting bounding boxes instead of a circular one and the first thing I had to do was to create a box that had the same size as each of the sprites we used. So I created one rectangle for the enemy and one for the projectile and used getGlobalBounds to get the global bounding rectangle of the said entity. After that I made it so that if they were to intersect, the enemy would take an x amount of damage and each of the projectiles that hit would get deleted.

Since we already had a life function for the enemy all I had to do was to point to that function and say that it would go down by x amount. If the life went down to equal to 0 or below the enemy would die (get deleted).

Same thing with the projectiles. We already had a way to delete them, so all I did was to point at that certain function and it deleted the projectiles everytime they hit the other hitbox.

However, some minor adjustments needs to be made on the enemy hitbox since it’s way too big in the front.

4333b23bf4e85eb5f1c540e31ef878d2

Week 4 (Movement, AI & Sprite Origins)

This week’s focus has solely been on the completion of the alpha stage of the game. The team split up the remaining things that needed to be done and hastely started to crunch some code.

The elements I had to fix/create was a movement fix due to the group getting a lot of comments about it feeling a bit of odd and difficult to manoveur, a sort of AI for our first enemy named the Prowler and fixing so that all sprite rotation origins were in the middle of the actual sprite.

First thing I decided to dive head first into was the movement fix. I was responsible for the last movement, so I had quite a bit of knowledge on how to make it better. While the last movement we had rotated and moved at the same time when holding down any button. The new movement system use A and D for rotation and W and S for forwards and backwards.

The first problem i encountered was that I didn’t exactly know how to get the ship to move the way the sprite was pointing towards. My fix for this was to use  an equation that included sinus and cosinus that calculated the degree the sprite was pointing towards. However, the ship didn’t move towards where the sprite was pointing, but to the side of the sprite. I fixed this by taking the initial equation divided by 180 multiplied by PI. Which rotated where the ship was pointing to where the sprite was pointing visually.

Second thing I had to do was to create a foundation for the future enemy AI in the game. Since it only needed to be simple all I decided to do was that if the player went closer than a certain amount towards the enemy, the enemy would aggro (meaning it runs towards the player). If the player then successfully managed to run further away than another amount the enemy would drop aggro (meaning it would run towards it’s original position before aggroing towards the player. However if the enemy managed to get within yet another amount of distance the player would take damage, resulting in the death of the player.

How I managed to do all of this is quit interesting. Firstly I wanted to get the distance between the player and the enemy. I used the pythagorean theorem to get this distance. (x^2 + y^2 = z^2) and then told the game that if that distance would go above, or below a certain number the enemy would either aggro , drop aggro or kill the player.

Last thing, and the least interesting thing I did this week was to manually fix all the wonky sprite origin points, since most but not all pictures middle point wasn’t the actual middle of the sprite in game. So all I did was looking up the exact point in a photo editor (paint, pixlr, photoshop etc) and then put in that point as the sprites origin. I did this for 5 different  sprites and it took longer than i expected since getting it pixel perfect was only achieved by trial and error.

64e48f4abaa1fd6795f6e0db844ca6d0

Week 2 & 3 of creating the game

This week’s main focus has been on the full completion of the game design document as well as creating/writing the foundation for the narrative and story. As usual the week started of quite slow but the pace has gradually increased since monday with the amount of work requiring to get done quickly blooming.

First objective  that needed to get done was the regulations/rules part for the game design document. Deciding how the player wins the game, how they lose the game, if there’s any score-system, how the player is supposed to feel rewarded or if there’s any time limit to name a few.

A few of the things that had to be completed required a groundwork for the balancing of the game. How much damage x weapon is supposed to deal or how much damage y enemy hits for. However, balancing a game takes time, so all numbers used are only there for testing purposes. When the ruleset and balancing framework got done the next focus was on the narrative and story.

Creating a world for the game also takes time, so using the limited amount of time left in an effective way is important. The goal wasn’t to create a fully working world with several factions/contries and races that all have different kind of ideologies and goals. The objective was to yet again, create a foundation that quickly explained how the world is supposed to be. who lives there, if they have any ongoing conflicts, are there any continents, if there are any interesting landmarks, what type of technology exists, the type of ideologies that may exist etc.

There’s a lot more than just this. A world is big but a universe is almost infinite and since the focus is not only on one world but two, the amount of detail that can be put in is pretty much endless.

After several hours of head scratching and loud sighs the foundation for both worlds are finally starting to come to an end. However, succesfully finalizing the creation of these worlds will never happen. There’s always room for improvement, always more details you can introduce. As long as all of it is important for the story of the game.

Last thing related to the the work this week was to change the name of the game. Since the previous name decided by a group last year, who also created the concept document we are following, did not fit the design and atmosphere we are going for now.

So instead of Colossus Core the game will now be called Desolate Echo. This is all subject to change, but the new title gives away the same vibe as what we’re aiming for the gameplay itself to give away.

Now to what was done the last week, which was the movement of the playership as well as the ability to strafe.

Firstly, managing to get the sprite to move. I looked up a tutorial on how to do it in a top down perspective which took around an hour to understand. First breakthrough was when the sprite started to move around the screen, which was, exactly what it was supposed to be doing. No problems what so ever to get it to work right, which was a relief. But, the next step was for the sprite to be able to rotate, which was a lot more difficult than anticipated.

So instead of attacking the problem head on I asked the lead programmer Erik in my group if he could quickly help me with it. The problem was that, since we couldn’t just write if(Button.down(S){Spin.Right} (as a really bad gimmicky example). We needed to make it so that the ship always would rotate so that it would as fast as possible get to the point we wanted. So if the ship was pointing in a 360º angle, which is upwards(W key) but you wanted to go to a 180º angle which is downwards(S key) you would have to write if(sprite.getRotation() < 360 && playership.getRotation() >= 180). Which resulted in the sprite rotating counter clockwise if you held down the S key,  until it get’s to a 180º angle. After that we managed to do it for all directions, so now the ship can drive around and rotate exactly how we want.

Lastly we had to implement a sort of drifting. So that when we let go of the W key, the sprite would continue in the direction it was originally going towards for a short while, like it was one ice. But since the tutorial I watched earlier already had me write a kind of acceleration code for when t he sprites starts to move, and when it stops to move all I had to do was to change a few numbers!

49bf3dcc5b66552e3cf0761e189737fe.gif